This is the evolution of one of my old favorites, which became a standby during my vegan college days back in the ’90s–when I developed a taste for more Middle Eastern foods in general. Especially in the summer, I used to like to make a …
Tonight I got an urge for some good old fried potatoes to go along with the shio koji-marinated pork tenderloin I had already planned. And why not jazz them up a little? This is one of my favorite variations on them, and the warm Indian …
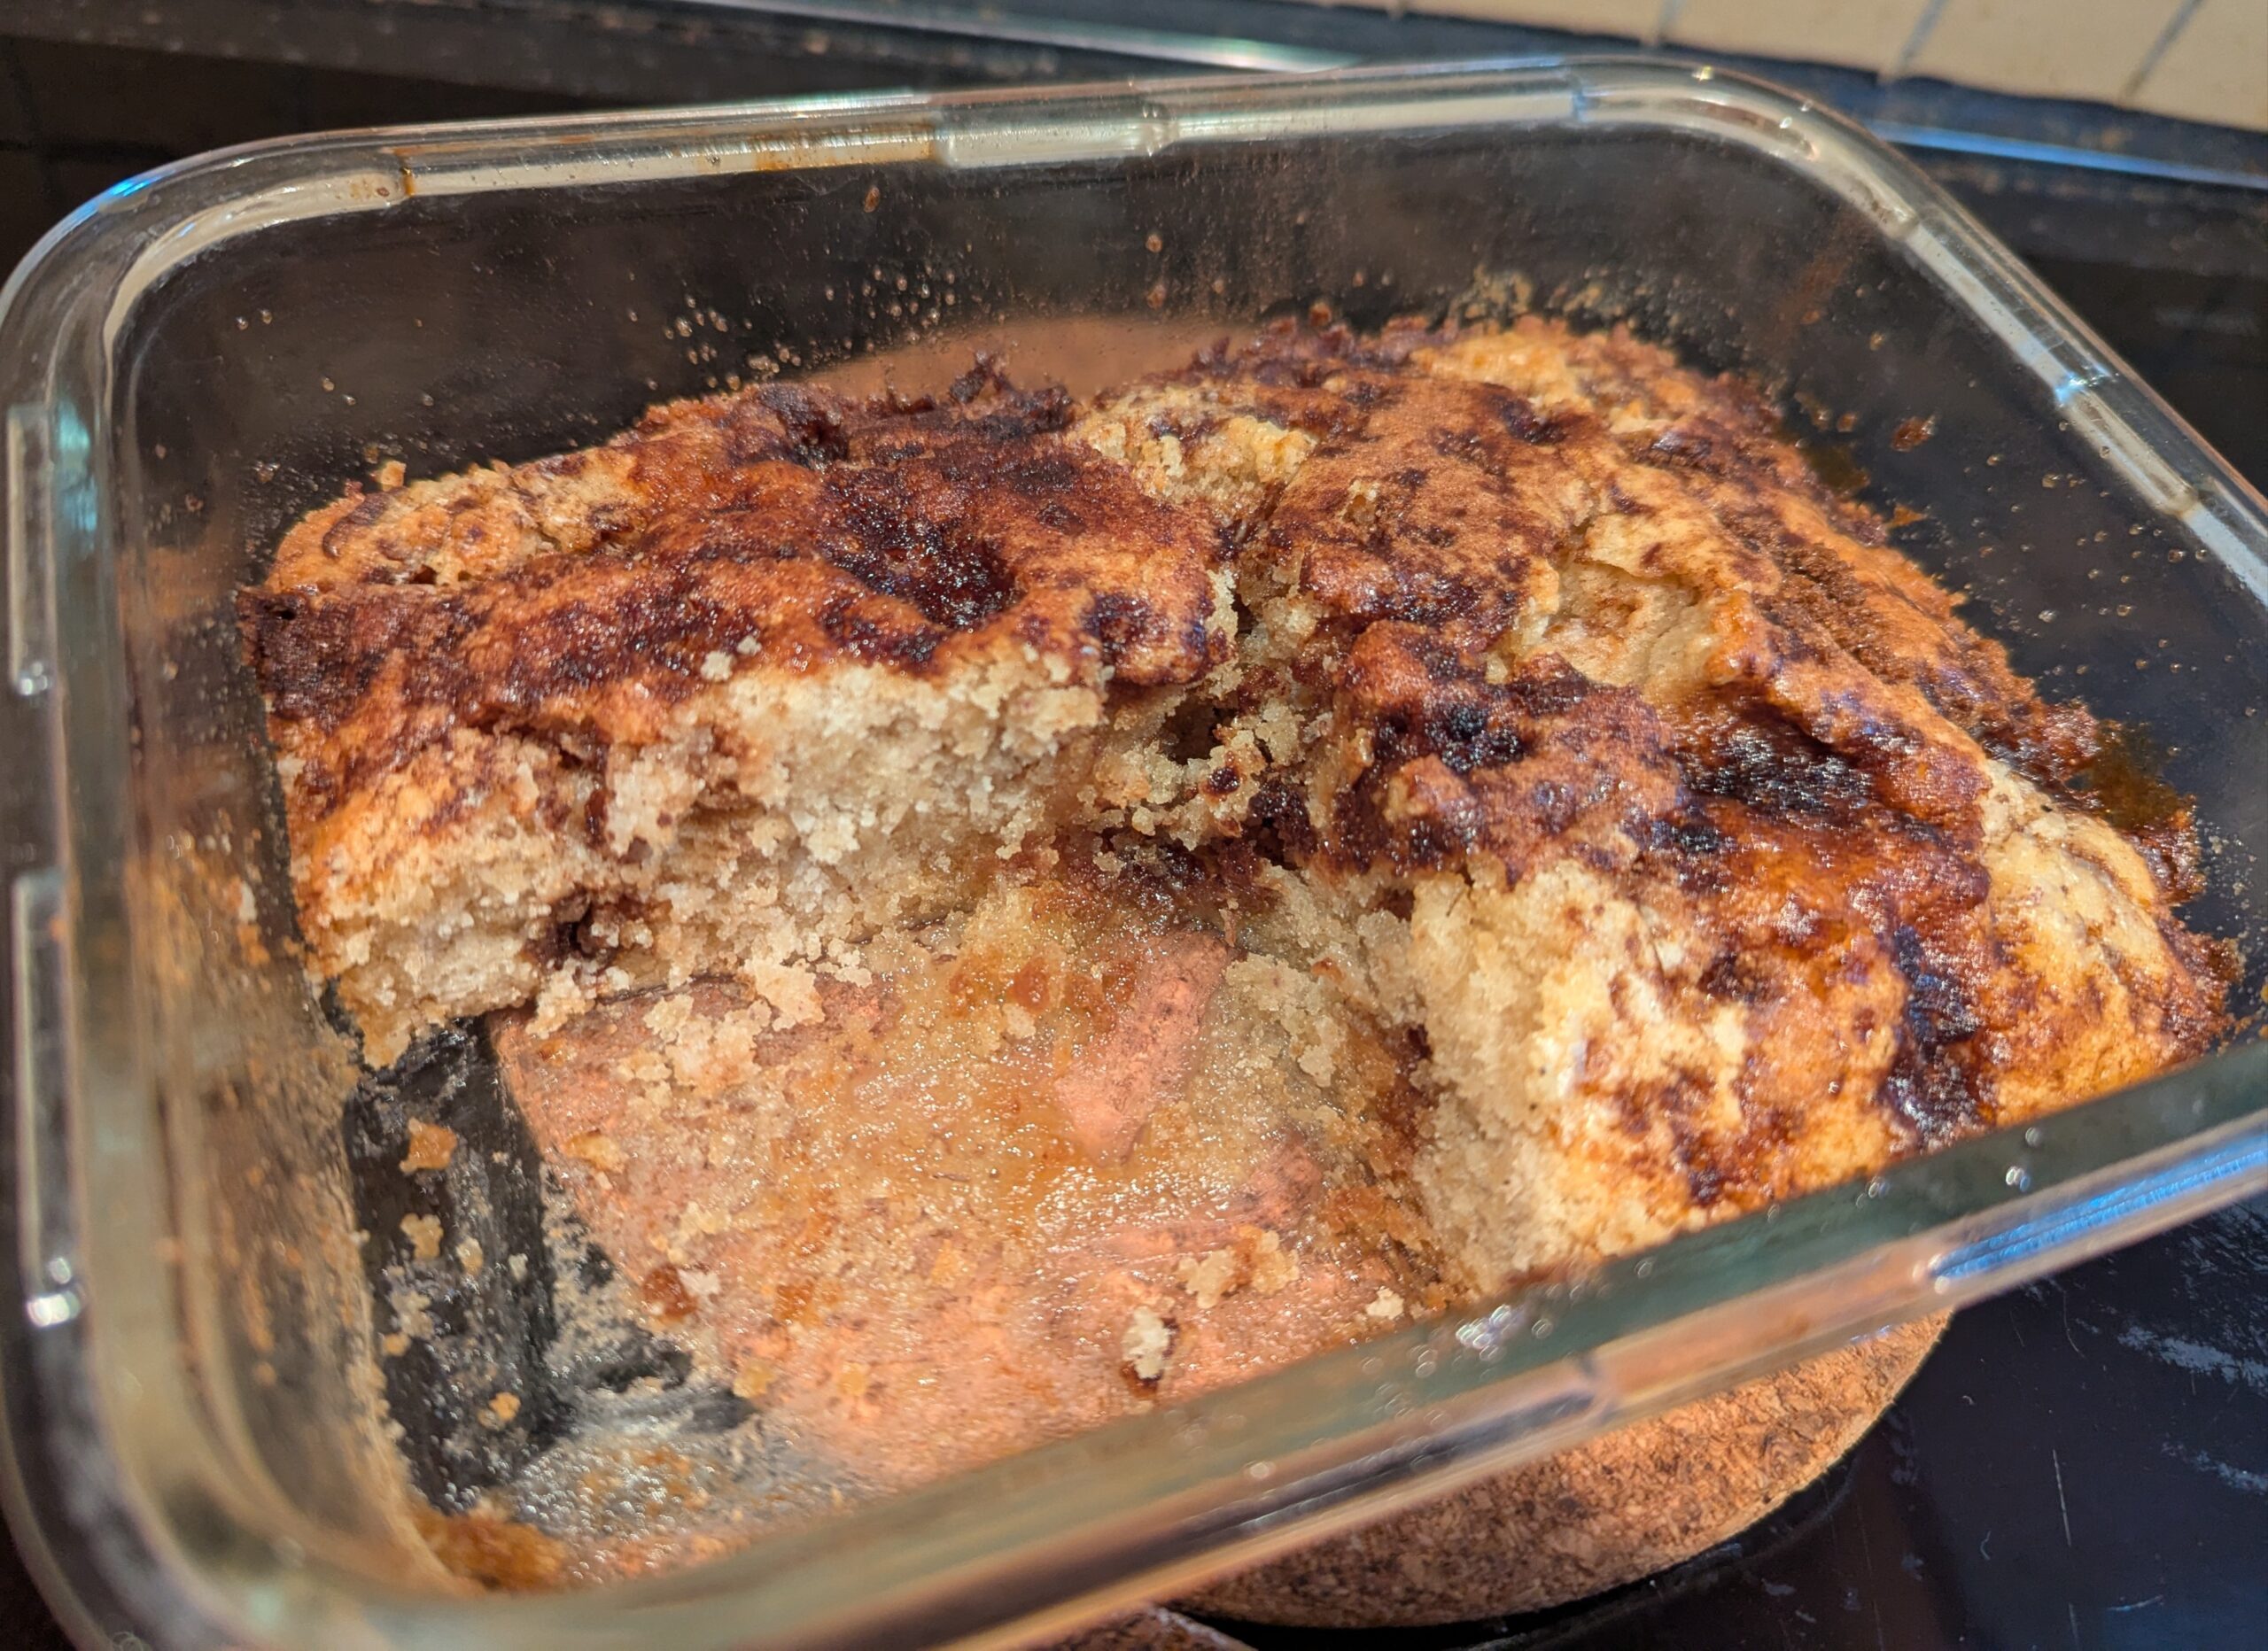
Tonight I was firing the oven up for a loaf of bread (that recipe is still under development), and got the urge to also bake something sweet while that was going anyway. This cake needed to bake at a slightly lower temperature (while also mostly preheating the baking stone on a lower rack in the process), so it worked great to do that that while the bread finished rising just a little more at “oven’s running” room temperature.
Today I settled on trying to throw together a half-batch version of this super-simple “Cinnamon Flop Cake” that I saved off r/Old_Recipes months ago.
Actually went scrolling back through my saved posts over there, looking for something sweet and easy I’d hoarded back that we had all the ingredients for. 😅 This one sounded promising. As it was, I ended up complicating the thing more by adding the obligatory pinch of salt and a little vanilla which sounded like it should be good. The coffee cake you make when the cupboards are getting a little bare, and you’re about to flop over?
The original recipe evidently came from Delicious AMISH RECIPES by Phyllis Pellman Good (“People’s Place Book No. 5”), which looks like it was published sometime during the ’80s.
It does use dairy, but no egg. And cakes are usually very simple to make GF. This should work well using most commercial 1:1 flour blends which are not formulated specifically for breads. It should also be easy enough to take dairy free, by using plant-based alternatives in place of the milk and butter.
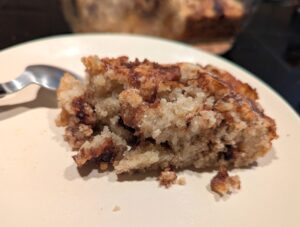
One tip up front, though? Don’t try to skinch out on the butter on top. It adds a lot of flavor, besides a gooeyness and texture almost like it has a crumb topping.
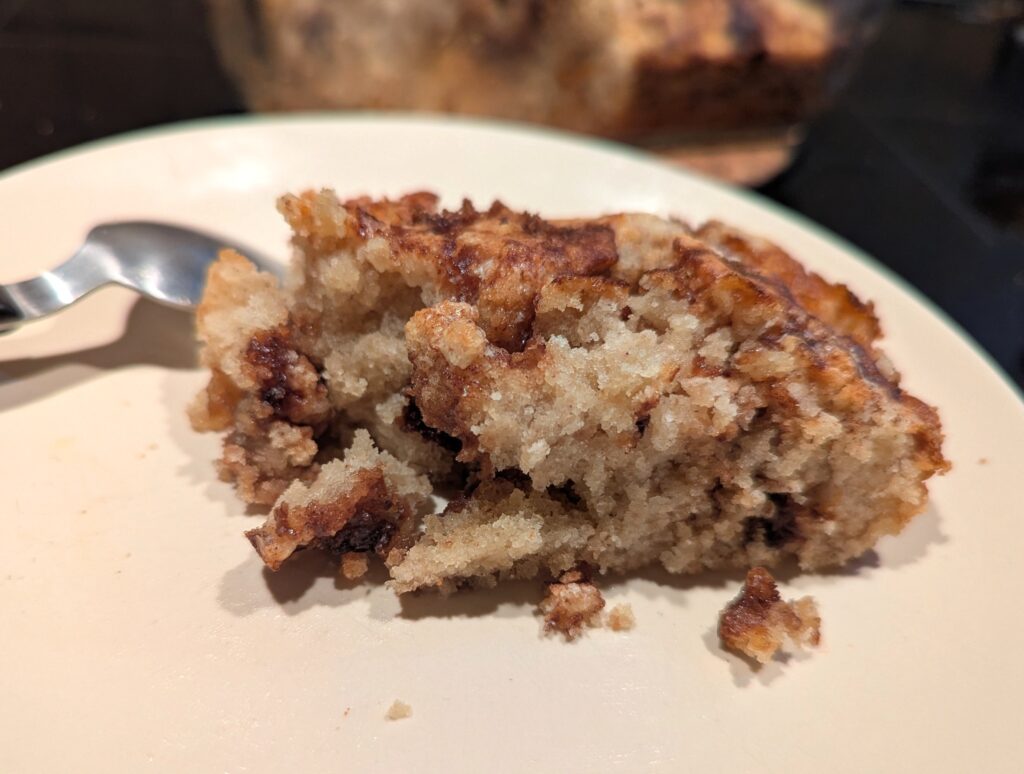
I inevitably tore up the first piece out, especially trying to extract it from the pan with that spoon while it was still warm from the oven. But, that really is buttery-gooey in the middle, particularly. It’ll no doubt stay together better once things cool down and firm up more.
The only real quibble here is that I could have used more cinnamon on this one. Didn’t want to overdo it, but “that looks like a good heavy dusting all over” didn’t go quite as far as I thought. Still just about what I needed tonight, particularly with my blood sugar trending down anyway from staying busy instead of eating properly. 🙄
A very simple, egg free coffee cake made with ingredients you probably already have on hand. Perfect for fika!
Prep Time10 minutesmins
Baking Time25 minutesmins
Total Time35 minutesmins
Course: Baking, Cakes
Cuisine: American
Keyword: Comfort Food, Egg free, Gluten free
Materials
1cupflour(250ml)
½tsp.xanthan gumif your blend doesn't already have gums
½cupsugar(125ml)
½tsp.vanilla extract or vanilla sugar
1¼tsp.baking powder1 tsp. if it’s double-acting
pinchof salt
½tbsp.melted butter(around 10g)
½cupmilk(125ml)
½tsp.vanilla extract or vanilla sugar
For The Pan
½tbsp.butter(around 10g)
For Topping
3-4tbsp.brown sugarloosely packed
3tbsp.butter(around 40g)
ground cinnamon to taste
Instructions
Preheat the oven to 350℉/180℃.
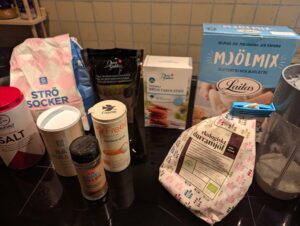
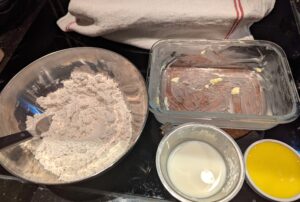
Gather your dry ingredients. This cake will go together quickly.I used a combination of around 25% each by volume of oat and sorghum flours, mixed with 50% of a starch-based commercial white flour blend here. Any multipurpose blend not specifically made for bread should work here. Only include the extra xanthan gum if your blend doesn't already contain it.The baking powder here isn't double-acting, so I use a little extra in a lot of things. Use the smaller amount if yours is.
I decided to use vanillin sugar today, since it's just to add a hint of flavor to a cake where that's not the main note. You can use extract instead, and this should go in with the wet ingredients.
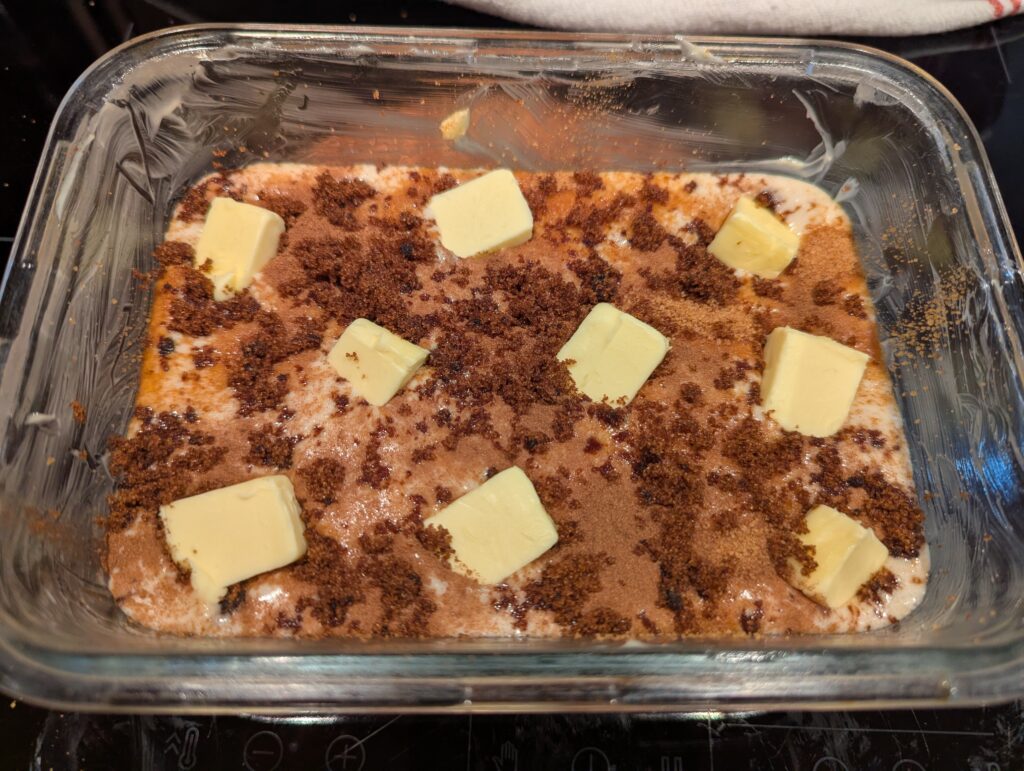
Gather your liquid ingredients including all the butter. Reserve about ¾ of the butter for your topping.Chunk up the butter, and use a small portion of it to grease your baking pan well. I used a 1L capacity IKEA "oven to table" Pyrex storage container, which comes with a handy lid to clamp on top once your baked goods have cooled down.Set aside another small portion of butter to melt for the batter.
Stir your dry ingredients together in a bowl. This batter is simple enough that I just mixed the whole thing with an eating tablespoon.Stir in your liquid ingredients, and pour the batter into the pan.
Sprinkle on a good amount of cinnamon, and top with the brown sugar. I used a mix of light and extra dark for flavor, but choose whatever you prefer.Arrange cubed butter around the top, pushing it partway down into the batter.
Bake for 20 minutes, then check for doneness by poking a skewer or toothpick into the middle. It's done when the stick comes out clean. Mine took 25 minutes in that pan in our oven.
Enjoy! This is particularly good while it's still warm, with a nice cup of coffee or tea.
I was actually wanting to try making some pepperoni rolls, and asked Mr. Sweden to pick up some sliced pepperoni at ICA because I saw they do carry it. The one he went to yesterday was apparently out, so he picked up the Scandi-“chorizo” instead. …
Recently, I took advantage of some seasonal deals and picked up some very nice thick bone-in pork which is particularly good for slower cooking. The portion that didn’t go into the freezer needed used up soon, and I had a hard time deciding what exactly …
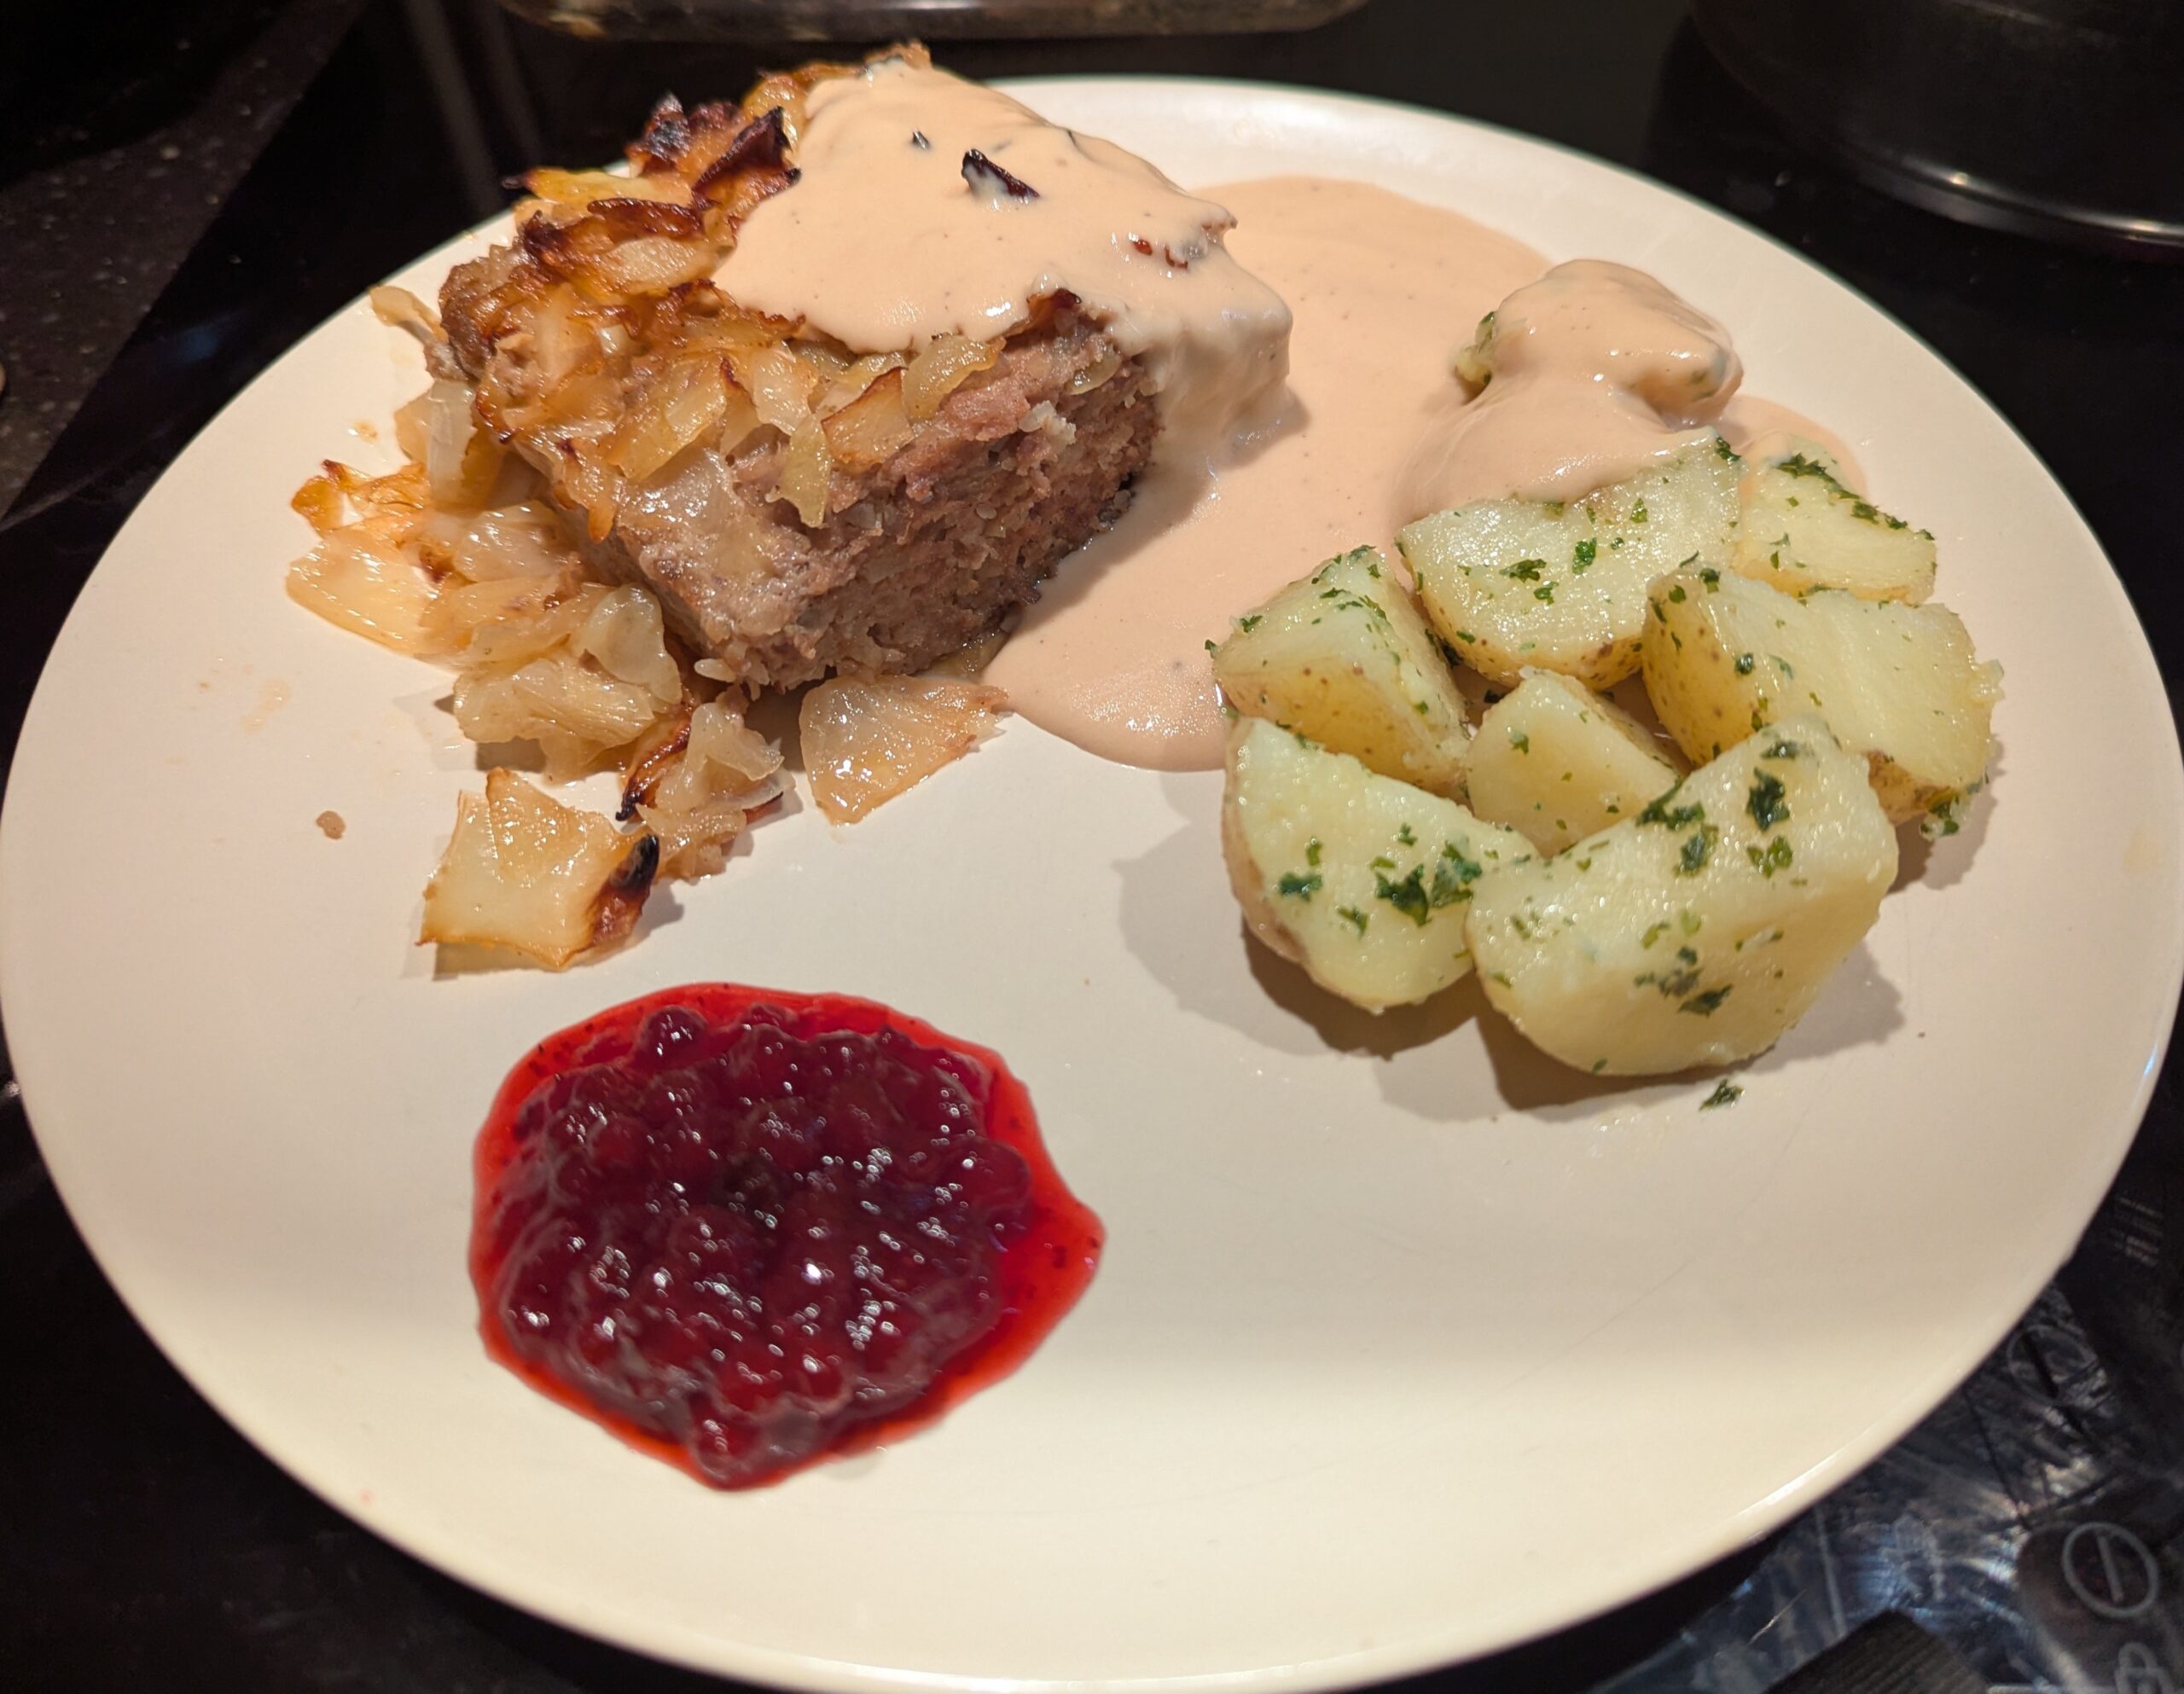
“Cabbage Pudding” is an old standard of husmanskost, or Swedish traditional home cooking. It is very similar to the local version of cabbage rolls, but less complicated to put together.
I have really enjoyed trying different Swedish dishes since we’ve been living here, and trying my hand at making some of them. Expect to see more of that soon. It’s probably been several years since I put together any proper cabbage rolls at all, and I’ve never cooked the Swedish style. The type I’m more used to are more coalfields Hungarian influenced, cooked with tomato which then gets used for a sour cream sauce. (Likely also the subject of a future post.) But, the tomatoless take here is also delicious.
The only cabbage we currently had already had part of it cut off, and I felt like fixing something slightly less involved anyway. So, I decided it was a good time to go ahead and put together this equally scrumptious “lazy” version. (Also for the first time.) It’s not a quick dish to make either, but most of that is the baking time.
Much like with meatballs, boiled potatoes are evidently the most classic accompaniment, but this should go equally well with mashed potatoes or even rice. Yesterday I opted for some buttery parsley potatoes. This also uses a rich gravy made with the pan juices, and generally cream.
Also classic is a dollop of lingonberry on the side, for a pop of sweet-tart contrast. You can use lingonberry jam (or even whole berry cranberry sauce, if that’s difficult to find). But, best is rårörda lingon (“raw-stirred”). It’s properly made with the raw berries, just stirred and crushed around enough to release some juices then sweetened to taste. Here, a jarred version is also readily available, which we’re using here. But, it’s generally much less sweet and jammy tasting, so you get more of the fresh tartness. To my own taste, that works much better with savory dishes. But, I am not a huge fan of salty-sweet flavor combos in general.
A Swedish home cooking classic, featuring juicy meatloaf nestled between layers of buttery caramelized cabbage and served with a rich and savory cream sauce. This makes for a delicious and filling weekend meal when the days turn colder.
Prep Time30 minutesmins
Active Time1 hourhr
Total Time1 hourhr30 minutesmins
Course: Casseroles, Main Course
Cuisine: Swedish
Keyword: Comfort Food, Fall, Gluten free, Winter
Yield: 4servings
Materials
For the Cabbage
600gwhite cabbage(1⅓ lb., or 5-6 cups) in bite sized pieces
1large onion, or two smallishchopped
2 tbspbutter
salt and white pepperto taste, can substitute black pepper
1tbspljus sirap / golden syrupor to taste, could substitute slightly less brown sugar
coarsely ground pepper
Meat Filling
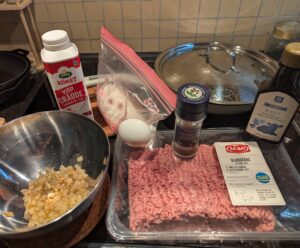
500gmix of ground beef and pork (1 lb.) or ground pork
300mlcooked rice(1¼ cup) good use for leftover rice
1large onion, or two smallishchopped finely
2tbspbutterfor softening the onion
1egg
100mlheavy or double cream(⅓ cup)
½tsptable salt
¼tspwhite pepperor use black
⅛tspground allspice
1tbspsoy sauce(gluten free if needed)
2tbspliquid beef stock concentrate
OR enough Better than Bouillon or crushed cubes to make 500ml/2 cups of broth, plus an extra teaspoon of soy sauce and enough water to make about 2 tbsp total
Cream Sauce
200mlpan juices from the casserole(or ¾ cup) plus water as needed to make the full amount
150mlheavy or double cream(or ½ cup; see notes)
1 tbspcornstarch
50mlmilk(or ¼ cup) plus extra if needed for consistency
1dashground allspice
white pepper to tasteit probably won't need more salt
To Serve
750gfirm-cooking boiling potatoes(or 1½ lbs.)
butter as desired
1.5tbspchopped parsleyfresh or frozen
lingonberry jampreferably the less sweet rårörda lingon
OR tart whole berry cranberry sauce
Instructions
Ingredient Prep
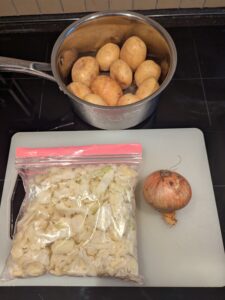
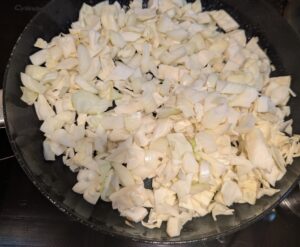
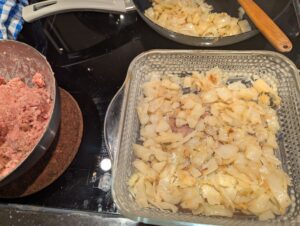
Assremble and prepare your vegetables.I cut the cabbage in advance, and wished I'd used more as called for here.
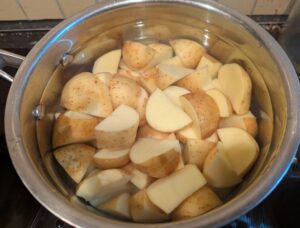
If you're cutting/peeling larger potatoes, keep them to the side in water to cover.
Soften the more finely chopped onion in butter. Reserve to the side to cool.
Start the oven preheating to 180℃/350℉.
In the same pan, start frying the cabbage and other onion over medium heat. After coating in the melted butter, add some salt and pepper and cover to let it steam in its own juices to soften for 10-15 minutes, stirring occasionally.
In the meantime, assemble the ingredients for the meatloaf layer.
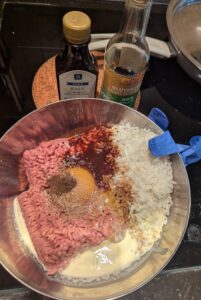
Place all the filling ingredients into a suitable mixing container, and combine well. Mixing with your hand(s) is the way to go here, and disposable gloves are awesome.
This will result in a pretty loose mixture, but don't worry. It will firm up when it's cooked.Tip: One quick and easy way to test for seasoning while you can still adjust it, is to place a bite of the raw meat mixture on a suitable dish and microwave it for maybe 30-45 seconds or until it looks cooked. You could also fry it. This did need a little more salt.
The cabbage may be close to done by now. Once it is on the slightly more tender side of tender-crisp, remove the lid. Fry for a few more minutes, stirring occasionally.You want at least a little browning. Near the very end, drizzle on a little syrup (or sprinkle sugar). Taste to adjust seasonings. I have to say I was initially skeptical of the syrup addition here, but just a subtle hint of added sweetness did work well. That will also help it caramelize if you want it browner, but I didn't want to risk seriously overcooking it to take it very dark.
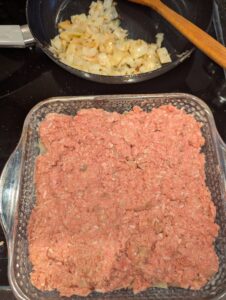
Grease an 8"x8"/20cmx20cm baking dish. Layer roughly half of the cabbage on the bottom.
Add on an even layer of the meatloaf mixture.
Top with the remaining cabbage.
Cooking
Bake the casserole for 45 minutes.
While that's cooking, put on the potatoes to boil in well-salted water.
When those are done, drain well and gently stir in some butter and the parsley. Don't worry about absolutely even distribution at this point. Cover and set aside. They should stay plenty warm until everything is done.
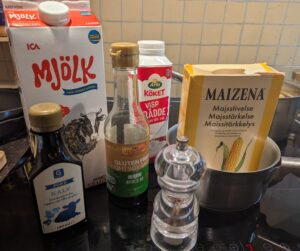
Assemble your sauce ingredients, and have a heatproof measuring cup ready to go.
When the baking time is up, carefully pour the collected juices from the baking pan into the measuring cup. Top the liquid up with water to 200ml (or ¾ cup).
Put the casserole back into the oven for another 10 minutes.
Pour the cup into a small saucepan. You can measure out your cream in the same cup. Pour that into the pan too.
Add in the seasononings. Bring to a simmer over medium-high heat.
While that heats, stir the cornstarch into the milk for your thickening. Turn the sauce heat down to barely simmering, and whisk in the milk and starch mixture to thicken.Adjust seasoning and consistency to your liking, with a little more milk and/or starch. Hold at a low simmer for a minute or so. We're looking for the slightly thinner side of a medium thickness here.
When the casserole is done, let it rest out of the oven for 10-15 minutes before cutting and serving.
Serving
Serve with the parsley potatoes, sauce, and a dollop of lingonberries on the side. Enjoy!
Notes
On the sauce measurements: That’s not an exact measurement conversion, but more how I would make it using US measurements. A little different proportions, but it should give you a very similar sauce either way.
Today we’re going for something a little different. I picked up an interesting-looking juice on sale, with the aim of turning it into a new small batch of grocery store wine. So, I thought I might as well post a little walkthrough of the process …
Like a lot of other people from the US, I grew up occasionally eating casseroles like this one, and find them incredibly comforting on a cool day. The versions we got were generally made using canned cream soups for a convenient sauce base. While it …
It was a good time for more fall soup today, and we still had some fresh chicken broth to use up.
To be fair, I could happily eat soups or stews several days a week when the weather’s not too hot. My family did that reasonably often while I was growing up. Soup can be an excellent inexpensive way to stretch out the resources you have, making good use of various leftovers and odds and ends in as delicious and nutritious a way as possible.
I try to keep the soup and stewmaking down a bit these days, both in the batch size and how often I turn them out, because I really am the main soup fan in this house. But, Mr. Sweden also particularly enjoys the occasional noodle soup. So, now we’re getting two different types a few days apart.
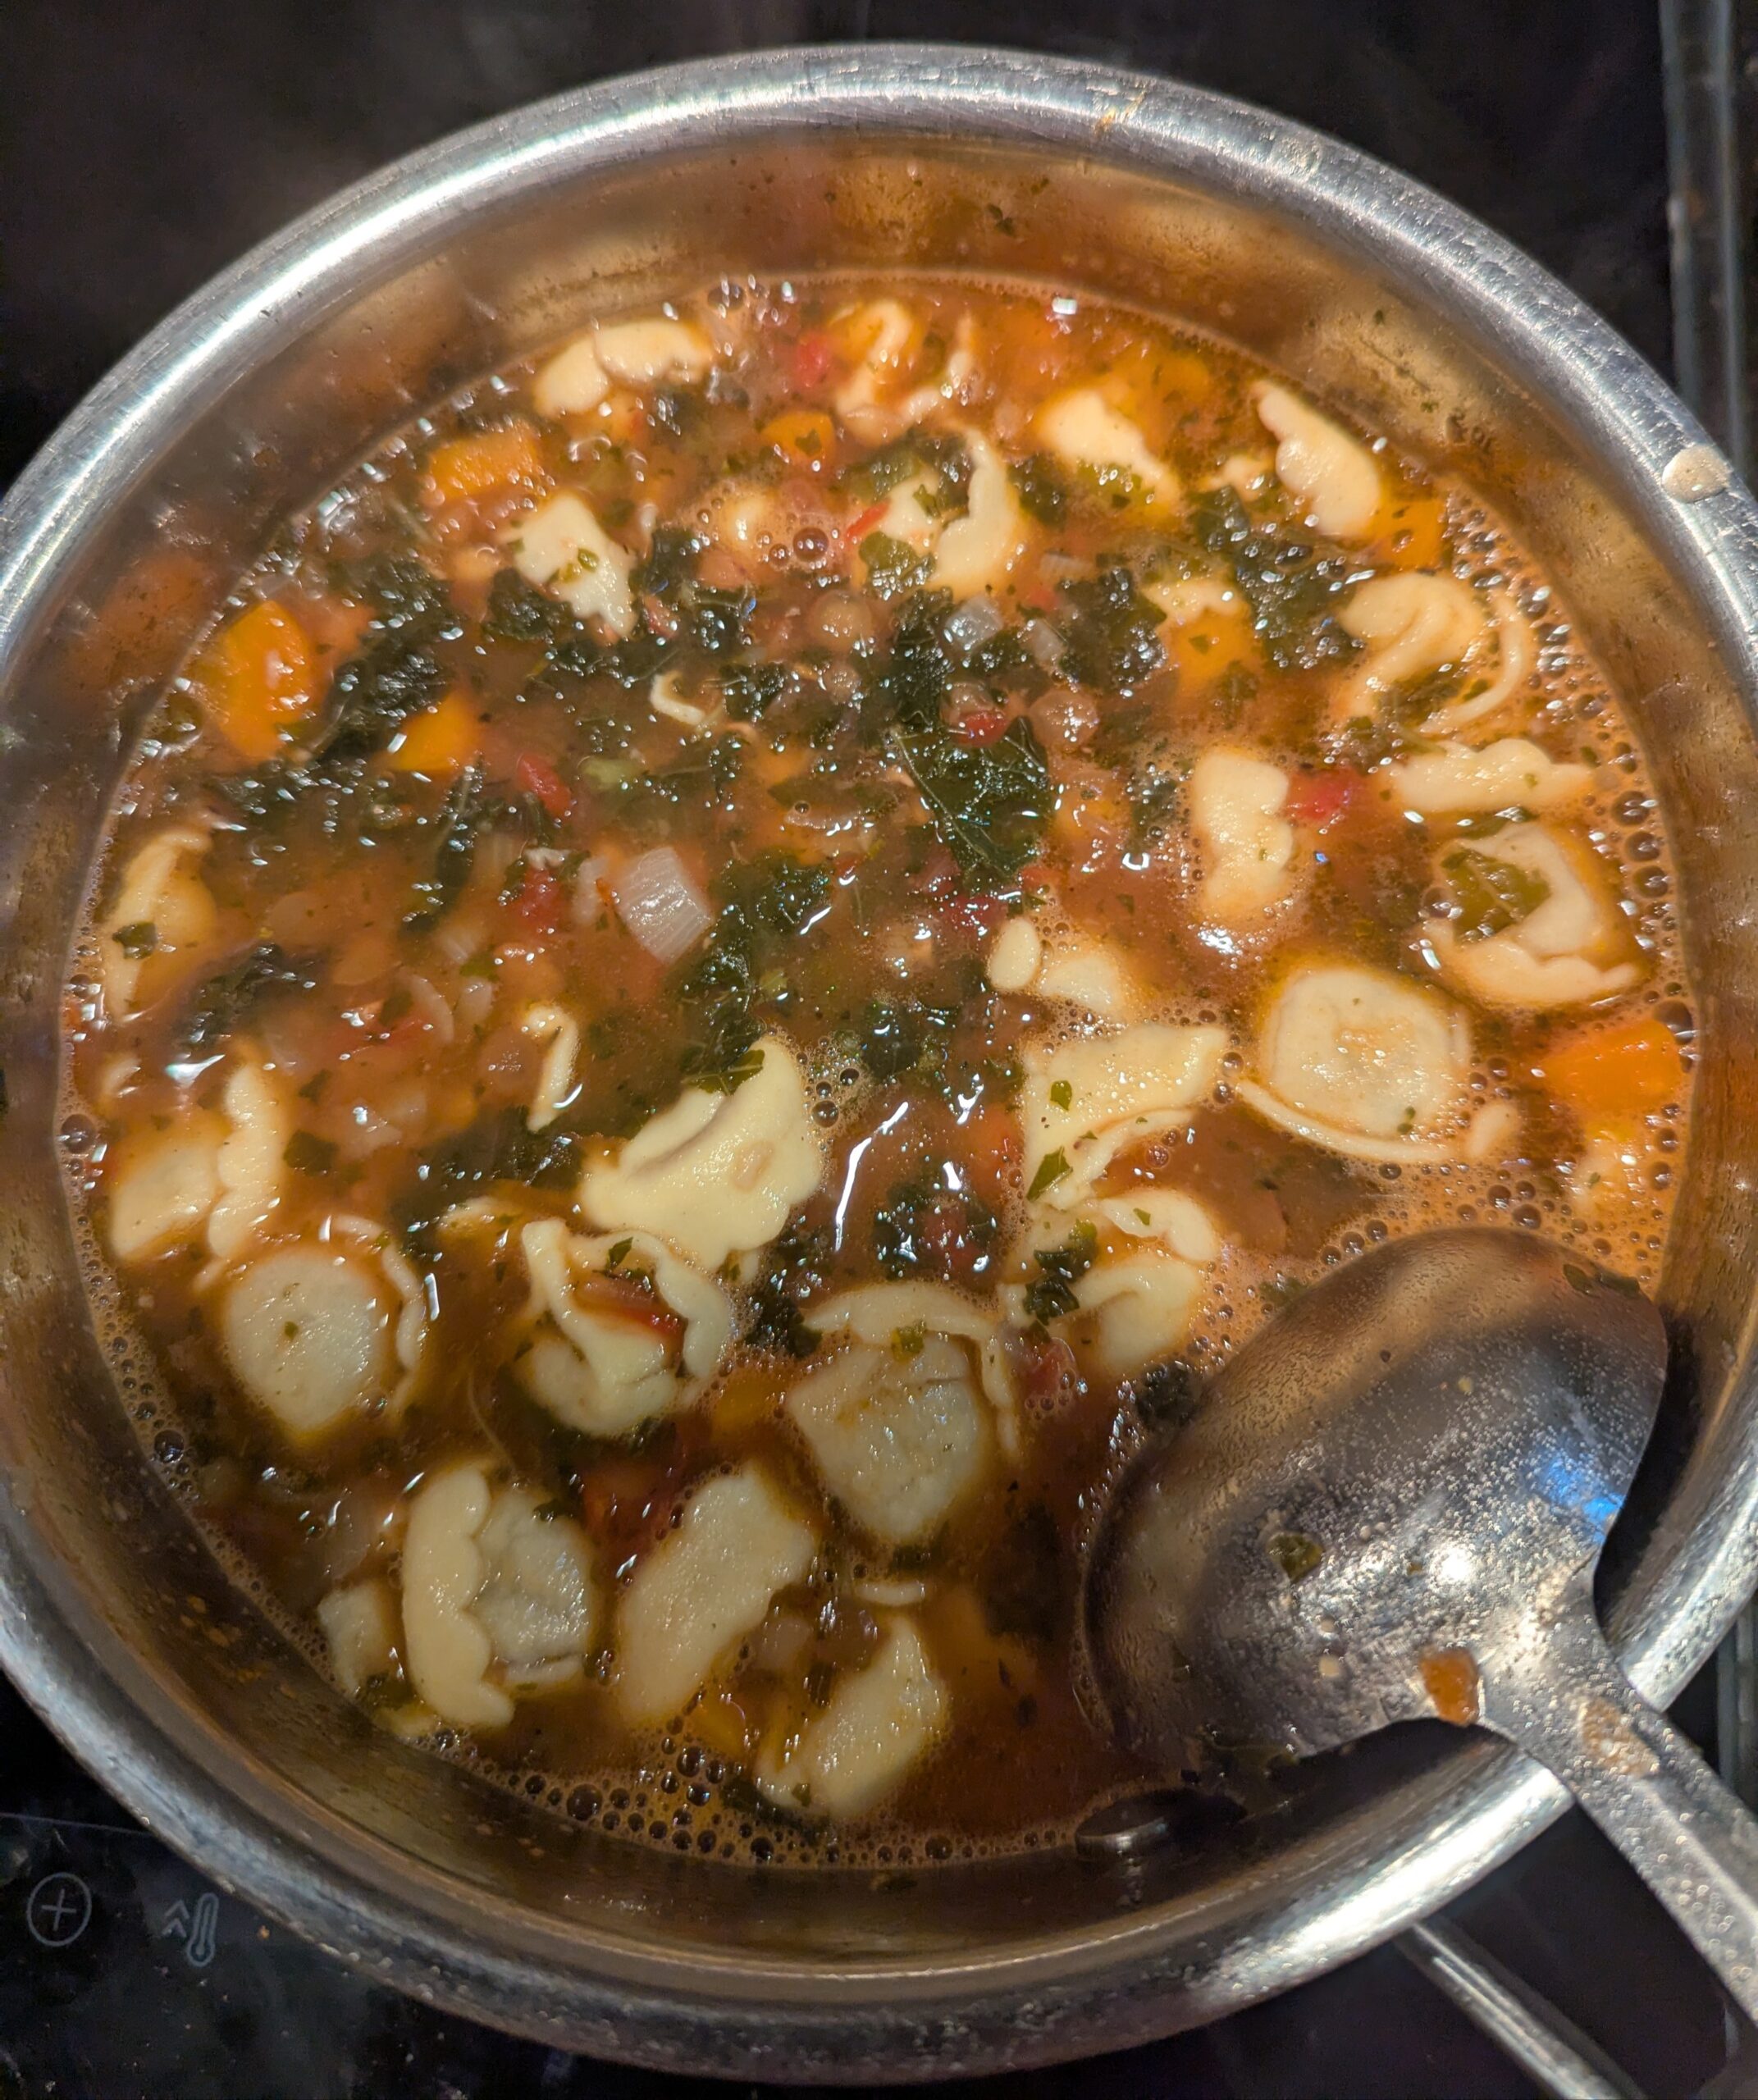
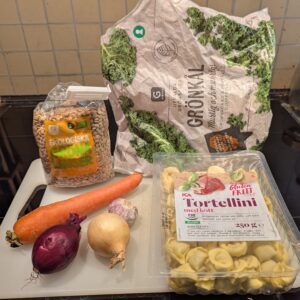
This wouldn’t be the first time I have used some of these ICA store branded refrigerated tortellini in a vegetable-based soup. He loves the fresh filled pasta for himself, and keeps picking these up for me too. While they are actually the best-textured gluten free stuffed pasta that I’ve had so far? I do think they work better as a dumpling cooked in soup with more going on, than to just eat a plateful lightly dressed like I used to with frozen ricotta and spinach ravioli in particular. Plus, this way, everyone gets to enjoy the filled pasta together!
This particular pack of tortellini had been in the freezer for a while, and I was remembering them as cheese stuffed. My original plan was to use some leftover cooked chicken in a similar soup. But, these turned out to have a beefy filling, so the lentils seemed like a better choice to go with that.
An easy hearty soup featuring packaged gluten free tortellini.
Prep Time10 minutesmins
Active Time50 minutesmins
Total Time1 hourhr
Course: Main Course, Soup
Cuisine: American
Keyword: Gluten free, Lentils, Pasta
Yield: 2
Materials
2small onionsor one larger
1-2stalksceleryoptional but recommended
1-2medium carrots
2clovesgarlic
100gkale or collard greens(or 4 oz./¼ lb.)
2tablespoonsolive oil
75mldry green or brown lentils(or ¼ cup)
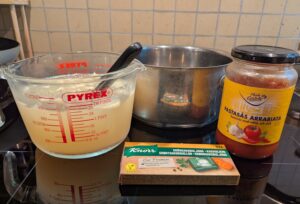
1literbroth of your choice(or a quart)
250gpackaged fresh/frozen tortellini of your choice(or 8 oz./½ lb.)
200mlchunky pasta sauce or canned chopped tomatoes(half a 400g/14 oz. can of tomatoes, or just under a cup of either one)
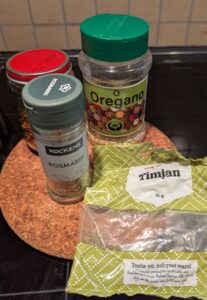
Seasonings
½teaspoondried rosemary
⅓teaspoondried thyme
½teaspoondried oregano
1bay leaf
½teaspoonred pepper flakesor to taste
¼teaspooncoarsely ground pepper
salt and pepperto taste
To Serve
grated Parmesan or Romano type cheese
Instructions
Preparation
Assemble your ingredients, starting with the vegetables and lentils.This is a home-frozen package of refrigerated gluten free meat filled tortellini (beef), which is sitting out to thaw some while I do the other prep.
Cut your veggies into soup-sized pieces, however you like. We're aiming for about 30 minutes of cooking time for most of them. Adjust as needed for your size pieces, or if you want them less tender.We did not have celery today, though I would include some if we did. We're also using frozen chopped kale, with around 100g left in the bag as it turned out.
Set the onion and celery to one side with your chopped or crushed garlic to use first, with the carrots and greens ready to go in later.
Also set the broth and tomato components ready to use.Today, I am using part of the recent homemade chicken broth, mixed half and half with Knorr vegetable bouillon. It'll be good with whatever broth you prefer. We also had an open jar of chunky Arrabiata sauce, so I am just using that instead of opening a can of chopped tomatoes.
Assemble your seasonings.I was using the already seasoned pasta sauce, so you might want to increase the herbs a bit if you're using canned tomatoes. Same goes for the salt, and any other seasonings that might apply.
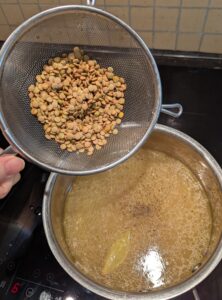
Rinse your lentils well in a strainer, looking through them for anything like small rocks or stray grains mixed in. (Particularly important if you need to avoid gluten!)Shake excess water off, and set aside.
Cooking
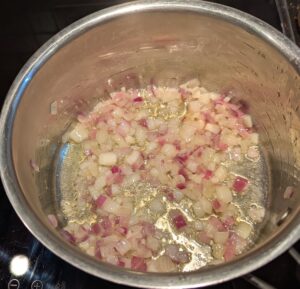
Sauté the onions and optional celery in olive oil in a heavy-bottomed pan of at least 2L capacity.. Again, we're not looking to get them particularly soft now, just cooked until they start turning translucent for the flavor. Add the chopped garlic, and continue frying for another minute or so.
Add in the broth, bay leaf, pepper, and lentils. I would also add the red pepper flakes at this point, if I were not using the pasta sauce later on with some chile already in it.Bring to a boil.
Simmer the lentils, covered, for 15 minutes. We're aiming for 45 minutes total with these before the tomatoes go into the soup and seriously slow further cooking.
Add the carrot and greens, along with the rosemary and thyme.. Bring back to the boil, then simmer covered for another 30 minutes.These particular frozen greens came chopped much more finely than I prefer, or how that brand usually comes. It doesn't look nearly as good this way, but I'm sure it will taste just fine.
After the 30 minutes are up, evaluate the lentils for doneness. These were soft all the way through, but not falling completely apart–which is what I was aiming for. Simmer for a few more minutes at a time as needed, until everything is done to your liking.
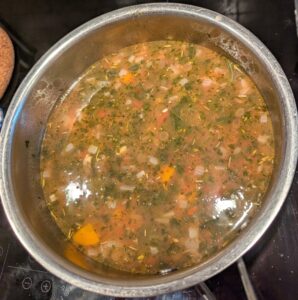
Once the lentils are fully cooked, add the tomato component and oregano.
Bring back to a boil, then simmer for another 5 minutes. Adjust the seasoning to your taste.This is a good point to hold the soup until you're wanting to eat very soon. Resting will only improve the flavor. I ended up letting this sit for nearly an hour before we were ready to eat.
Bring the soup back up to a boil, and stir in the tortellini. Keep it at a high simmer or low boil for maybe 3 minutes, then test a piece for doneness. This needed about 5 minutes to my liking. The fresh pasta does cook very quickly.
Looking good! Time to eat.
Sprinkle on some grated hard cheese to serve, as you like. Tonight we had some refrigerated pre-grated Grana Padano.
Enjoy!
Notes
This soup is easily made vegetarian if you use vegetable broth and a vegetarian stuffed pasta.
Swedes are pretty serious about their pea soup. It is almost like their version of a good old pot of pinto beans back home. You can easily find canned versions, like this “Soldier’s Pea Soup” from Knorr. (Which is pretty good.) Also refrigerated versions in …